VPN SETUP FOR pfSense
1. Download our file with configs and certificates: blackvpn_linux.zip (md5)
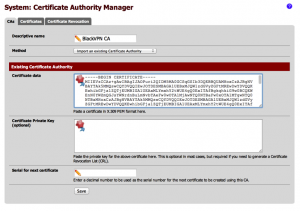
2. That zip file contains various .conf files (which should NOT be used for pfSense - create your own via the GUI instead) as well as a folder called “ssl”. Within that folder, there are two files: ca.crt (Certification Authority certificate), and ta.key (Transport Layer Security key). We’ll need ta.key in a minute, but let’s start with ca.crt. First of all, open it in a text editorSelect all the text in the file and copy it to your clipboard. Then, in pfSense, go to System > Cert Manager, and under the CAs tab, click the plus button to add a new CA. Add a descriptive name for the CA (“blackVPN CA”, for example), and paste the text for the CA into the box for the certificate data as follows and click save:
3. UPDATE: pfSense 2.2 now allows entering OpenVPN client credentials in the GUI - jump to step 4.
For pfSense 2.1 and earlier the next step is to set up pfSense’s OpenVPN client to connect to blackVPN’s server. Before we do that though, we need to create a file on the pfSense box that contains our blackVPN username and password. This is because the pfSense OpenVPN configuration screens don’t provide anywhere to enter those details, so we pass them to the process via a text file in the pfSense filesystem. To create this file, we need to start a shell session on our pfSense box. Note: if you’re in front of your pfSense box (i.e. with a keyboard, monitor, and mouse), you can skip enabling Secure Shell in pfSense, and you should pick up these instructions from creating the text file containing the user details by pressing 8 from the pfSense main menu to start a shell session (it looks almost exactly like the screenshots below, except you don’t enable Secure Shell, and you don’t start the session remotely using PuTTY or a terminal). To configure this without being in front of your pfSense machine, you need to turn on Secure Shell access to your pfSense machine in System > Advanced:
Check the box to ‘enable secure shell’, and press save. Once you’ve done that, use PuTTY on Windows, or the terminal on a Mac or Linux, to open a remote session to pfSense. This will bring you to the pfSense main menu. Choose 8 to start a shell session, navigate to wherever you want the file to, enter “vi vpnpassword“, and press enter. Here’s how starting such a session and starting vi looks on my machine, where my pfSense box is configured at 192.168.27.1: 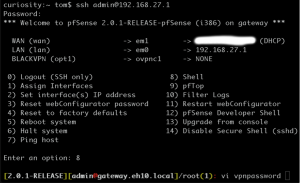
Once you’ve got vi open, press i, to put vi into insert mode, and then enter your blackVPN username and password on consecutive lines, like this:
Press escape, and then type “:wq” to save the file and quit vi. Please see the vi cheat sheet for further details on using vi. Note that the file needn’t necessarily be in /root as I’ve created it in this example. Now we’ve saved our file, type exit to quit the shell session. That will take you back to the main pfSense menu. If you’re logged in remotely, press 0 to exit.
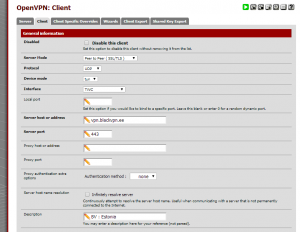
4. Finally, we’re ready to set up the OpenVPN client in pfSense. To do this, in pfSense, go to VPN > OpenVPN, and click the Client tab. Then click the plus button to add a new client. The top half of the dialog should look like this (I’ve chosen the Estonia server, but you can use whichever blackVPN server you like):
blackVPN server list:
| Canada: | ca.vpn.blackvpn.com |
| Estonia: | vpn.blackvpn.ee |
| Lithuania: | vpn.blackvpn.lt |
| Luxembourg: | vpn.blackvpn.lu |
| Netherlands: | vpn.blackvpn.nl |
| Panama: | vpn.blackvpn.com.pa |
| Russia: | vpn.blackvpn.ru |
| Switzerland: | vpn.blackvpn.ch |
| Ukraine: | vpn.blackvpn.com.ua |
| Singapore: | vpn.blackvpn.sg |
| UK: | vpn.blackvpn.co.uk |
| USA East: | eastcoast.vpn.blackvpn.com |
| USA West: | westcoast.vpn.blackvpn.com |
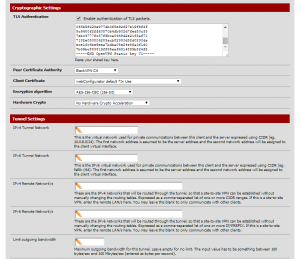
To fill in the second half of this page, you’re going to need to go back to the files you downloaded from blackVPN. Open ta.key in a text editor, and copy its contents to your clipboard. In order to enter the TLS key, you need to uncheck “Automatically generate a shared TLS authentication key”, which will reveal a text box for you to paste in the TLS key provided by BlackVPN. So, do that, and the second half of the page should look like this:
NOTE ADVANCED SETTINGS
Things to note on this page:
- As mentioned, paste the TLS key from ta.key into the TLS Authentication box.
- Ensure that the Peer Certificate Authority is set to be “blackVPN CA” (or whatever you named it in step 2 above). The client certificate isn’t important.
- The Encryption Algorithm should be changed to AES-256-CBC.
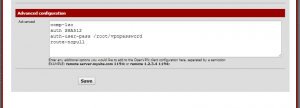
- You’ll see we have added some advanced settings.
- comp-lzo – this turns on compression for the connection. While the connection to BlackVPN is made without this option, I couldn’t get anything to work.
- auth-user-pass – this is how you give pfSense’s OpenVPN client your BlackVPN username and password. The parameter is the path to the file on your pfSense box which contains your username and password. In this example, the file exists at /root/vpnpassword (while this is where I created the file, and it works, it may not be best practice to put the file there, but as long as it can be read by the process, it doesn’t matter where the file lives).
- auth 512 - set HMAC message digest algorithm to SHA512.
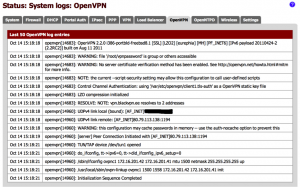
5. Having entered all the details above, click save. This will start the VPN in the background. To confirm what’s happening in pfSense, go to Status > System Logs, and click the OpenVPN tab. The magic words you’re looking for are “Initialization Sequence Completed”, and the full log should look something like this:
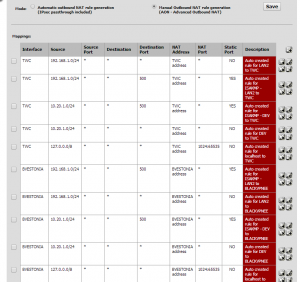
6. The final step – and you should do this after the VPN connection has been successfully established – is to change the outbound NAT mode from automatic to manual. So to do this, go to Firewall > NAT and click the manual Outbound tab, then you need to duplicate each rule, change the interface to Blkvpn, and change the description, finally save. That screen should subsequently look something like this:
(Please note that I changed the name of my WAN interface to my ISP, Virgin, during this writing of this guide – substitute “WAN” for “VIRGIN” if you’re confused).
7. And that’s it. Give it a minute, then confirm that your IP address is reported as being one of BlackVPN’s by going to http://www.whatsmyip.org. Alternatively, blackVPN’s home page will tell you where it thinks you are: http://www.black-vpn.online.


